Free Delivery over $50

Fast and free to your door

Exclusive Savings

On your favourite products

Satisfaction guaranteed

145+ five-star reviews

chevron_left chevron_right

Tony's Chocolonley

Recipes

View

Banana and Dark Chocolate Self-Saucing Pudding with Chocolate and Coffee Sauce - Cook & Nelson

Banana and Dark Chocolate Self-Saucing Pudding with Chocolate and Coffee Sauce

This delicious recipe comes to us from our friends at Kōkako Coffee by the talented Kelly Gibney. The classic, cosy kiwi dessert gets a major upgrade here with the natural sweetness of bananas, creamy oat milk, dark chocolate chunks and a coffee infused sauce that delivers ultimate richness. Ingredients 1 ripe All Good fair trade banana, peeled and mashed 1⁄2 cup All Good Barista Oat Milk 1 free range egg 1/3 cup melted coconut oil (cooled a little) 1 cup white spelt flour (regular will work too) 2 tsp baking powder 3 Tbsp dark cocoa powder 1/3 cup coconut sugar 60g Tonys Chocolonely 70% dark chocolate, roughly chopped For the Sauce: 1 cup coconut sugar 3 Tbsp dark cocoa powder 1 cup hot Kōkako filter coffee 1⁄2 cup boiling water To Serve: 1 banana, peeled and halved lengthways Method: 1. Preheat oven to 180c 2. Whisk together the banana, milk, egg and coconut oil. In a large bowl sift the flour, baking powder and cocoa powder. Stir through the sugar 3. Create a well in the middle and pour in the wet ingredients. Stir until just combined and then fold in the chocolate 4. Grease an oven-proof 1.5 litre capacity baking dish. Spoon the batter into the centre of the dish. Smooth the top slightly but the batter does not need to be spread right to the sides. Top with the halved banana, cut-side up. Press lightly into the batter 5. Whisk together the sugar, cocoa, coffee and boiling water for the sauce. Carefully pour into the dish. It can be helpful to do this over the back of a large spoon to stop the boiling water disturbing the surface of the pudding batter 6. Bake for 25-35 minutes until the pudding feels lightly firm and springs back when pressed 7. 
Ideally allow it to sit for 10-15 minutes before serving

Read more

Caramel Sea Salt Chocolate Chip Cookies - Cook & Nelson

Caramel Sea Salt Chocolate Chip Cookies

Looking for something to whip up this weekend? We think the only thing more delicious than chocolate chip cookies are these gooey-delicious caramel sea salt chocolate chip cookies. Special shout out to @‌beckybakes for this delish recipe.Ingredients 125g butter 100g light brown sugar 75g white granulated sugar 1 tsp salted caramel flavoring 300g plain flour 1 1/2 tsp baking powder 1/2 tsp bicarbonate of soda 1/2 tsp sea salt 1 Tony’s milk caramel sea salt bar, chopped into chunks Recipe Combine butter, light brown sugar & white granulated sugar in a bowl. Mix. Add the egg & salted caramel flavouring. Mix. Add the plain flour, baking powder, bicarbonate of soda & sea salt. Mix. Knead mixture into a dough & add the Tony’s chunks. Roll into 8 balls Freeze for 30 minutes (or up to 3 months if you want to keep some for later) Bake for 10-12 minutes at 180°C Decorate chunks of Tony’s Drizzle with salted caramel sauce Leave to cool for 30 minutes Admire your work. 🍪 And feast on your salty-sweet treats!

Read more

Peppermint Brownie Cookie Sandwiches - Cook & Nelson

Peppermint Brownie Cookie Sandwiches

Warm, ooey-gooey rich chocolate goodness with sweet peppermint candy crunch. Could a cookie be any more festive? Trick question. Servings: 12Prep Time: 20 minCook Time: 10 minTotal Time: 30 minIngredients:For the Brownie Cookies 2 cups All Purpose Flour 1 tsp. Fine Sea Salt ¾ tsp. Baking Soda 1 cup Brown Sugar 1 180g Tony Chocolonely Dark Chocolate Candy Cane Bar, melted 10 tbsp. Unsalted Butter, softened 1 large Egg 1 Egg Yolk For the Peppermint Buttercream 12 tbsp. Unsalted Butter, softened 3-4 cups Powdered Sugar 1 tbsp. Milk 1 ¼ tsp. Peppermint Extract 1 tsp. Vanilla Extract ¼ cup Crushed Peppermint + more for decorating Method: In the bowl of a stand mixer, combine the butter and brown sugar. Beat for 2 minutes, until smooth. Add the egg, egg yolk, and melted chocolate. In a separate bowl, mix the flour, salt, and baking soda together. Add into the chocolate bowl and mix just until combined. Cover the cookie dough with saran wrap. Chill in the fridge for at least 30 minutes. Preheat oven to 375F. Line 1-2 large baking pans with parchment paper. Using 2 ½ - 3 tablespoon cookie dough each, place the cookie dough balls on the prepared pans leaving 2” space in between. Bake for 6-8 minutes, gently slam the cookie tray down on the stovetop to create that crinkle top. If the cookies are not set in the center, bake an additional 1-2 minutes. Let the cookies cool on the pan for 5 minutes before transferring to wire rack to cool completely. To make the buttercream: Add the softened butter in the bowl of a stand mixer. Beat for 1 minutes, until smooth. Add remaining ingredients and beat for 5-6 minutes, until light and fluffy. Transfer the peppermint buttercream to a piping bag to pipe onto half of the cookies. Top with another cookie and roll the edges in crushed peppermint to decorate. Enjoy! Share a picture of your Tony's Chocolonely creations by tagging us on Instagram @cookandnelson.

Read more

Rocky Road with Tony’s Chocolonely - Cook & Nelson

Rocky Road with Tony’s Chocolonely

Recipe by Kelly GibneyThis delicious, indulgent jumble of all the most delicious things to eat is fun to make with kids. You can’t mess it up! Use this recipe as a guide and add in your favourite things. Lovely to gift and share.Ingredients: 1 x 180g bar Tony’s Chocolonely Dark Chocolate 1 x 180g bar Tony’s Chocolonely Milk Chocolate 160g marshmallows – halve if very large 8 ginger biscuits – roughly chopped 80g pistachios – roughly chopped 100g Tony’s Chocolonely White Chocolate Raspberry Popping Candy – roughly chopped ½ cup dried cranberries ½ cup toasted coconut chips To garnish: freeze-dried raspberries (optional) Method: Break the dark chocolate and milk chocolate into pieces and melt (together) in a double boiler. Stir until smooth. Place all the other ingredients in a large bowl, pour over the melted chocolate and mix well. Spoon into a slice tin lined with baking paper. Press down lightly on the top to push the slice together more. Place in the fridge to harden. Garnish with a sprinkle of freeze-dried raspberries if desired. Slice into pieces. Store in an airtight container. Share a picture of your Tony's Chocolonely creations by tagging us on Instagram @cookandnelson or Facebook @cookandnelsonnz.

Read more

Spooky Halloween Brownies - Cook & Nelson

Spooky Halloween Brownies

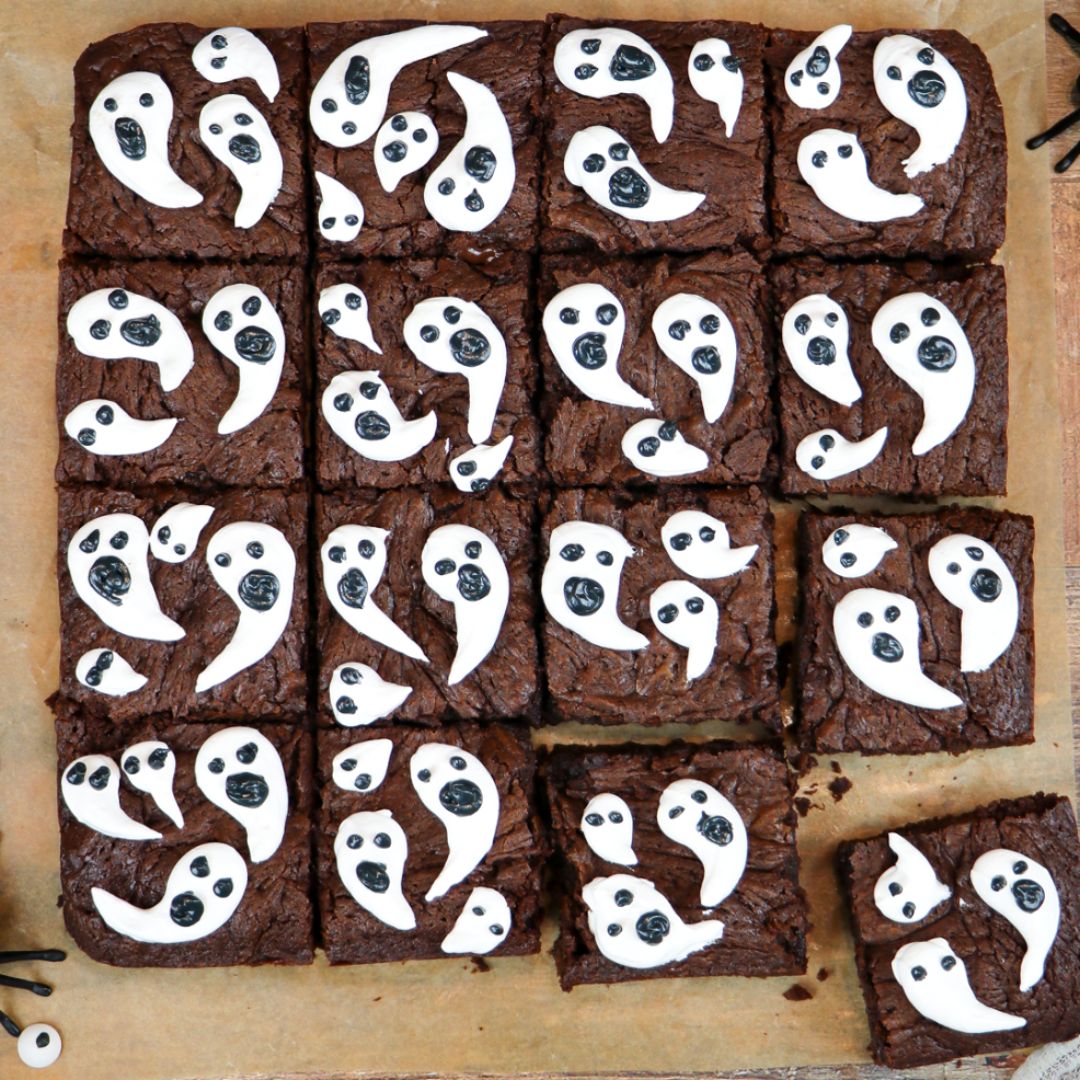
Boo! That's the one thing you won't hear after serving these tasty Halloween brownies. Better yet, get the fam together and decorate your treats together! Details: Servings: 16 Prep Time: 20 min Cook Time: 20 min Total Time: 40 min Ingredients: For the Meringue Frosting (Ghosts): 1/2 cup Granulated Cane Sugar 1 large Egg White, room temperature 1/4 tsp. Cream of Tartar Pinch of Salt 1 1/2 tbsp. Water 1/2 tsp. Vanilla Extract For the Brownies: 2 x 180g Tony’s Chocolonely 42% Dark Milk Pretzel Toffee bars 3/4 cup All Purpose Flour 1/2 tsp. Salt 1/4 tsp. Baking Soda 2 large Eggs, room temperature  3/4 cup Brown Sugar 10 tbsp. Butter, melted 2 tbsp. Water 1 tsp. Vanilla Extract Instructions:​​​​​​​ To Make the Brownies: Preheat oven to 165°C. Line an 20 x 20cm or 23 x 23cm baking pan with two strips of parchment paper to create “sleeves” for easy removal after baking.  Chop one 180g chocolate bar into large chunks to melt over very low heat. Set aside.  In a large bowl, mix the flour, salt, and baking soda together. Set aside.  In the bowl of a stand mixer, beat the eggs, brown sugar, and melted butter for 2 minutes on high speed, until creamy.  Mix the water and vanilla extract into the egg mixture.  Add the flour mixture and melted chocolate into the egg mixture. Fold just until combined. Be careful not to overmix as this will create more cake-like brownies.  Chop the last chocolate bar into small chunks and fold into the brownie batter.  Transfer the brownie batter into the prepared baking pan.  Bake for 25-30 minutes, the center will look slightly underbaked. To test for doneness, insert a toothpick into the center. If the brownies are finished baking, the toothpick will come out with a few moist crumbs on it.  Let cool in the pan for 1 hour before slicing into 16 squares.  To Make the Meringue: Combine all the ingredients except the vanilla into a stainless steel, heavy-bottomed saucepan. Place the mixture over medium-low heat and beat with an electric hand mixer nonstop for 5 minutes. Remove from heat and beat an addition 3-5 minutes, until the frosting is fluffy and stiff peaks. Fold in the vanilla.  To Assemble: Remove 1/4 cup meringue to mix with black food colouring for the ghost eyes and mouth. Transfer the meringue into a piping bag with a large round tip. Pipe on 2-3 different sized ghosts by piping a small amount then carrying it down a little ways and swirling up the create the iconic ghost shape. Repeat with both large and small ghosts sizes. Pipe small circles for the ghost eyes and mouth with the black meringue. Enjoy! We'd love to see your Tony's Chocolonely creations! Tag us on Instagram @cookandnelson.

Read more

Frankenstein Macarons - Cook & Nelson

Frankenstein Macarons

Looking for desserts to serve at your Halloween party or just to treat yourself? Check out this recipes for Frankenstein Macarons - all made with Tony's Fairtrade and B Corp certified chocolate! Details: Servings: 16 Prep Time: 20 min Cook Time: 10 min Total Time: 30 min Ingredients: For the Macarons: 1 1/4 cup Powdered Sugar 1 cup Almond Flour, superfine 1/2 tsp. Fine Sea Salt 3 large Egg Whites, room temperature 1/2 cup Fine Sugar, like caster sugar 1/2 tsp. Cream of Tartar 1/2 tsp. Vanilla Extract 3 drops Green Food Coloring For the Chocolate Ganache Filling: 1/4 cup Heavy Cream 180g Tony Chocolonely Milk Chocolate To Assemble ‘Frankenstein’: Melted Tony's Chocolate Candy Eyes Instructions: To Make the Macarons: In a large bowl, mix the powdered sugar, superfine almond flour, and sat together. Working in small batches, sift the mixture through a fine mesh sieve into a separate bowl. Discard any lumps in the sieve afterwards. Set aside.  In the bowl of stand mixer, beat the egg whites and cream of tartar until soft peaks. Add the caster sugar and vanilla extract to beat until stiff peaks. Fold in the green food colouring until your desired “Frankenstein” macaron colour.  Add half of the almond flour mixture to the egg white bowl. Using a spatula, fold the mixture in a series of turns, rotating the bowl slightly as you turn. Once well-combined, add the remaining almond flour. Repeat with the series of turns. By the end, you should be able to ‘draw’ a figure 8 without the batter breaking.  Transfer the mixture to a large pastry bag with a medium sized round top (such as, ateco #805).  Place the macaron template on a sheet pan. Pipe a very small amount of the macaron mixture in each of the four corner, then place a piece of parchment paper on top. Pipe out the batter inside the size of the circles drawn on the template, or about 3.8 cm in diameter. Repeat to fill remaining circles. Carefully but firmly bang the sheet pan against the counter 4-5 times to remove any air bubbles.  Allow the macarons to sit out at room temperature for 40 minutes to 1 hour.  Bake at 150°C for 10-15 minutes, or until risen and set on top. Keep a close eye starting at 10 minutes to ensure they do not brown.  Let cool completely.  We'd love to see your Tony's Chocolonely creations! Tag us on Instagram @cookandnelson.

Read more

Jack O'Lantern Pumpkin Cookies - Cook & Nelson

Jack O'Lantern Pumpkin Cookies

These Jack O'Lantern pumpkin cookies with Tony's chocolate ganache are as sweet as pumpkin pie... but even better tasting if you ask us If you've been looking for a fun fall activity, you've found it. Booyah! Details: Servings: 16 Prep Time: 20 min Cook Time: 8 min Resting Time: 2 hrs Total Time: 2 hrs 28 mins Ingredients: For the Chocolate Ganache: 1/2 cup Heavy Cream 2 x 180g Tony's Chocolonely 70% Dark Chocolate bars  For the Pumpkin Sugar Cookies: 3/4 cup Butter, softened 1 cup Granulated Cane Sugar 3/4 cup Brown Sugar 2 large Eggs, room temperature 1/2 cup Pumpkin Puree 1 tsp. Vanilla Extract 5 cups All Purpose Flour 1 tbsp. Pumpkin Pie Spice 1 tsp. Baking Powder 1/2 tsp. Fine Sea Salt Instructions: For the Sugar Cookies: Beat the softened butter, granulated cane sugar, and brown sugar for 2 minutes on high speed. Add in the eggs and beat for 1 more minute, until smooth and creamy. Stir in the vanilla extract.  In a large bowl, mix the flour, pumpkin pie spice, baking powder, and salt together. Add into the egg mixture and fold together just until combined.  Press into a large rectangle, tightly cover with saran wrap, and refrigerate for 1-2 hours.  Preheat oven to 400F. Line two large cookie sheets with parchment paper.  Lightly flour a clean surface. Roll out the chilled cookie dough to 1/8” thick. Using pumpkin-shaped cookie cutters, cut out an equal amount of cookies. Transfer to the prepared cookie sheets.  To create the jack o’lanterns, carefully use a small sharp knife to cut out the faces of a jack o’lantern on half of the cookies.  Bake for 6-8 minutes, until lightly golden on the edges. Let cool completely while you make the ganache filling.  For the Chocolate Ganache: Chop the chocolate into small chunks and place into a bowl. Heat up the heavy cream until steaming but not boiling. Pour over the chocolate chunks and leave uncovered for 10 minutes. The chocolate should be melted and smooth when you stir it all together. Cool uncovered for 20-30 minutes before transferring to a piping bag.  To Assemble the Jack O’Lanterns: Pipe a small amount of chocolate ganache on the regular pumpkin cookies, spreading out an even layer with an offset spatula. Add a jack o’lantern cookie on top and gently press down. Repeat with remaining cookies. (Optional: Dust with powdered sugar or orange icing.) Enjoy! We'd love to see your Tony's Chocolonely creations! Tag us on Instagram @cookandnelson.

Read more

Good Morning Fairtrade Smoothie - Cook & Nelson

Good Morning Fairtrade Smoothie

By Kelly Gibney Serves 1-2Start your day (or brighten up your afternoon) with this indulgent Fairtrade smoothie. With a creamy banana base, flecks of rich dark chocolate and a kick of coffee, it’s a treat you can feel very good about. Ingredients: 1 All Good Fairtrade banana, frozen in chunks 80ml Kōkako filter coffee (cooled) or 30ml Kōkako espresso (cooled) 50g Tony’s Chocolonely 70% Dark Chocolate, roughly chopped 1 tablespoon Noble Maple Syrup 02: (Tahitian Vanilla Bean matured maple) ½ teaspoon vanilla extract 1 cup milk (any will work) Generous pinch ground cinnamon Method: Place all your ingredients into a powerful blender and blitz until smooth. Pour into a tall glass and garnish with additional chopped chocolate.

Read more

Salted Almond Chocolate Hot Cross Buns - Cook & Nelson

Salted Almond Chocolate Hot Cross Buns

This recipe celebrates all there is to love about Easter - Chocolate and Hot Cross Buns! And the combination of delicious Tony’s Chocolonely Salted Almond chocolate and Ironclad Pan toasted almonds in lots of lovely butter sets these Hot Cross Buns apart from any you’ve ever tasted. Deliciously spiced and sweet, dripping with chocolate and with the additional crunch of rock salt, they’ll have your whānau leaping out of bed as soon as they smell them cooking and begging you to make more. And the best thing about Tony’s Chocolonely chocolate? There’s not a mouthful of child slavery in any bite. We love this. Keep Easter clean by checking the chocolate you are eating is sustainably and kindly produced. It matters. From the Ironclad Pan team. Happy Easter! INGREDIENTS:YEAST SPONGE ¼ c warm milk 1 T yeast. 1 T flour 1 t brown sugar THE SALTED ALMONDS 1 c almonds, roughly chopped 75 g soft butter ½ t salt flakes THE DOUGH 2 1/2 c white flour 2 T Mixed spice 1 T cinnamon powder ¼ c cacao or cocoa powder, sifted ¼ c brown sugar ½ c glazed mixed peel, roughly chopped ¾ c warm milk 1 egg 1 t vanilla essence 170 g salted almond Tony’s chocolate, roughly chopped. Extra cacao or cocoa powder to dust. PAN PREPARATION 1 T butter 1 t salt flakes 1 t cocoa or cacao powder. PASTE ½ c water ½ c flour Salt flakes to sprinkle on top GLAZE 1 egg yolk – before the bake 2 T maple syrup – after the bake METHOD: To make the yeast sponge. In a small bowl, sprinkle yeast over the milk, flour and brown sugar, stir gently and leave for 10 minutes in a warm place, till fluffy and risen. In your Lil’ Legacy Pan melt the butter and sauté the chopped almonds and salt over a low heat for 3 minutes or until just starting to brown. The almonds will continue to cook in the pan after you have removed them from the heat. Set aside to cool. Mix all dry ingredients together then add chopped citrus peel and buttery toasted almonds and mix well. Make a well in the centre of these ingredients and add half the warm milk, the egg and vanilla essence. Whisk lightly to combine ingredients. Add the yeast sponge and the remaining milk and use a wooden spoon to combine the dry and wet ingredients. Turn the mix onto the benchtop liberally dusted with cocoa or cacao powder. The dough should be a little bit sticky. Add extra powder if the mix is sticking to the bench. Knead for 10 minutes, until the dough is shiny and elastic. Form the dough into a ball and leave to rise, covered, for an hour in a warm place. Liberally grease your Ironclad Legacy Pan with butter then dust with salt flakes and cacao or cocoa powder. The amount of salt you use is up to you! Once risen, knead the dough for a further 5 minutes. Form into a log and cut into 12 equal pieces. Using your hands, mould each piece into a ball and pat out into circles about 10cm in diameter. Evenly sprinkle the chopped chocolate in the middle of each dough circle. Seal the buns by pinching the doughy edges together firmly. Roll lightly in your hands to create a perfect bun shape then place seam side down in your prepared Ironclad Pan. Glaze the top of the buns with egg yolk and finish with a sprinkle of salt flakes. More or less depending on your tastebuds. Mix flour and water paste together, stirring well to remove all lumps and pipe a cross pattern on top of each bun. Leave to rise for 45 minutes covered in a warm place (don’t cover with a tea towel or cling film as this will ruin your crosses! I use an upturned bowl). Bake at 180°C for 30 minutes. Remove from the oven, brush with maple syrup and serve to the table hot with lashings of butter. And feel the love!

Read more

Tony’s Chocolonely Easter Bark - Cook & Nelson

Tony’s Chocolonely Easter Bark

Recipe by Kelly Gibney This is such a fun explosion of colour, texture and an absolute deliciousness. Perfect for gifting at Easter time or as a playful dessert.INGREDIENTS: 1 x 180g bar Tony’s Chocolonely Dark Chocolate 100g Tony’s Chocolonely White Chocolate Raspberry Popping Candy TO TOP: 4 Tony’s Chocolonely Eggstra special easter eggs halved Pieces of Tony’s Chocolonely chocolate – roughly chopped, use a range of dark and light flavours Handful roasted almonds – roughly chopped Handful roasted pistachio nuts – roughly chopped 1/3 cup freeze-dried raspberries 1/4 cup dried strawberry slices METHOD: Melt the dark chocolate and the white chocolate (separately) using a double boiler. Pour the dark chocolate onto a large tray lined with baking paper and spread out using a spatula. Dollop the melted white chocolate over the top – about 6 dollops. Use a chopstick or skewer to swirl the white chocolate through the dark to create areas of dark and light with swirls. Scatter the halved eggs on top, followed by the chocolate pieces. Sprinkle over the chopped nuts and lastly the freeze-dried and dried fruit. Place in the fridge for 1-2 hours until firm. Break into pieces. Store in an airtight container. Share a picture of your Tony's Chocolonely creations by tagging us on Instagram @cookandnelson or Facebook @cookandnelsonnz.

Read more

Tony's Ultimate Choc Drip Cake - Cook & Nelson

Tony's Ultimate Choc Drip Cake

Get your Easter bake-on with Georgia's Cakes ultimate Tony's choc drip cake! Flex your baking muscles with this show stopping chocolate egg-stravaganza guided by Georgia Green (@georgiascakes) INGREDIENTS: For the bottom tier 6-inch cake: for the 6 inch cake: 250g butter 250g Fairtrade caster sugar 200g (4) eggs 200g self raising flour 50g Fairtrade cocoa powder 1 tsp baking soda 150g plain yoghurt For the 2nd tier of 8-inch cake: 500g butter 500g Fairtrade caster sugar 400g (8) eggs 400g self raising flour 100g Fairtrade cocoa powder 2 tsp baking soda 400g plain yoghurt For the chocolate meringue buttercream (filling & coating for the 6 inch cake): 150g egg whites (about 5 large egg whites) 300g caster sugar 300g room temperature, unsalted butter 1 bar of Tony’s dark chocolate For the chocolate drips: 70g Tony’s dark chocolate 100ml whipping cream How to make the 6-inch cake: Preheat your oven to 170°C on fan Grease and line 2 x 6-inch cake tins Heat the butter in a saucepan on a low temperature until it's fully melted but not bubbling Combine the melted butter and the sugar in a large bowl using a whisk Add in the eggs and mix together to fully combine Sift in the flour (and baking powder if using plain flour), cocoa powder and baking soda and mix until fully incorporates Add in the yoghurt and mix in until the batter in completely smooth Evenly distribute the batter between the two tins (approx. 550g per tin) Bake for 45 - 50 minutes until the cakes are fully baked through, springing back to the touch Leave to cool completely on a cooling rack Georgia's top tip: Bake your cakes the day before decorating. Once the cakes have cooled, wrap them in clingfilm and leave at room temperature - not in the fridge. It's much easier to decorate a cake the day after it's been cooked! Less crumbs!​​​​​How to make the chocolate meringue buttercream (filling & coating for the 6-inch cake): In a stand mixer bowl or metal/glass bowl, mix the egg white and caster sugar using a rubber spatula, until fully incorporated Place the bowl over a pan of simmering water and continue mixing the sugar and egg whites with the spatula Heat up this mixture until it reaches 65°C and the sugar has completely dissolved, continuously mixing to ensure the temperature remains even throughout Place onto a stand mixer with a whisk attachment, or use an electric hand whisk and whisk the egg whites and sugar until a thick and glossy meringue has formed (approx. 5-10 minutes) Once a thick glossy meringue, leave the bowl and meringue to cool completely at room temperature Meanwhile, break up the Tony's chocolate bar into a heat proof bowl and melt the chocolate in the microwave at 30 seconds bursts or over the pan of water that you used before Once melted, leave to one side and let's finish off the buttercream! Start whisking the meringue again on a slow-medium speed Gradually add cubes of butter into the whisking meringue Once all the butter is inside the meringue, continue whisking at the same speed until it thickens and totally changes consistency (it may look like it's splitting but that's a good sign!) Turn up the speed high and whisk until the buttercream has come together and all the butter has mixed in Fold in the melted chocolate into the buttercream with a spatula until fully incorporated Georgia's top tip: if the buttercream is quite soft, place the bowl into the fridge for 10-15 minutes and then re whisk it.How to make the chocolate drips: To make the chocolate ganache drips, simply melt the chocolate and cream together. Either in the microwave at 30 second bursts or heat the cream in a small saucepan and once it's steaming, add the chocolate and let the steam of the cream melt the chocolate. The ganache should be quite loose; you may need to add more cream to achieve the correct consistency. Here's a bit more about Georgia:"I started my baking journey at Le Cordon Bleu in London where I trained in patisserie for 6 months. I always knew I didn’t want to work in a restaurant or hotel after my training, so I found myself working at a small coffee shop in London baking the fresh produce but giving it all a fancy twist. Word got out quickly that I started baking and all of a sudden people were asking me for birthday cakes. Even though I wasn’t trained in cake decorating, I took my knowledge and skills that I learnt from pastry school and applied it to cakes which gave my cakes a unique look. My cakes somewhat stood out amongst others and therefore gained popularity quite quickly which led me to launching Georgia’s Cakes in 2015 where I was selling bespoke cakes as my full time job. Over the years, my cakes were being sold in Harrods food hall in London and I worked with some very well known companies and made cakes for celebrities such as Cara Delevingne and Rihanna!""After opening my YouTube channel, I shifted my focus to teaching and now host regular cake workshops as well as sharing my recipes, tips and tricks online!"

Read more

Truffles with Tony’s Chocolonely Dark Milk Chocolate Toffee Pretzel - Cook & Nelson

Truffles with Tony’s Chocolonely Dark Milk Chocolate Toffee Pretzel

By Kelly GibneyMakes 16-18 truffles Truffles are deceptively easy to make. They look impressive when served, taste wonderful and last well. They’re perfect for entertaining and make a thoughtful and delicious gift. INGREDIENTS: 1 block Tony’s Chocolonely Dark Milk Chocolate Toffee Pretzel  1/3 cup fresh cream ½ cup almond meal 1 tablespoon butter INGREDIENTS: Break the chocolate into small pieces. Place the chocolate and cream in a heatproof bowl over a pot of simmering water (do not let the bowl touch the water) and stir until smooth. Add the butter and almond meal and mix well. Place in the fridge until the chocolate has hardened enough to roll – usually 1 ½ hours. If the mixture hardens too much, leave at room temperature until pliable. Roll teaspoons of chocolate into balls and place on a plate lined with baking paper. If coating your truffles in melted chocolate, first place in the fridge to harden. If coating in crushed nuts it is best to do it right after you’ve rolled them while still sticky enough for the coating of nuts to adhere to.  Store in an airtight container in the fridge for 2-3 weeks. COATING We like to choose a couple of different coatings to give the truffles lovely visual appeal when served together or gifted. Dip in melted Tony’s Chocolonely 70% Dark chocolate and then sprinkle with a little flaky sea salt or freeze dried raspberry powder. OR Blitz a handful of pistachio nuts in a blender or food processor until fine. Roll the truffles in this. Share a picture of your Tony's Chocolonely creations by tagging us on Instagram @cookandnelson.

Read more

Tiramisu with Tony’s Chocolonely Milk Chocolate Toffee Pretzel - Cook & Nelson

Tiramisu with Tony’s Chocolonely Milk Chocolate Toffee Pretzel

By Kelly Gibney Serves 8 This fun spin on a traditional Italian favourite has 2 layers of chopped toffee pretzel chocolate that brings wonderful texture and a little toasty, savoury note that is fantastic. INGREDIENTS: 4 free range egg yolks 1/3 cup caster sugar 2 teaspoons vanilla paste 350ml fresh dairy cream  350g mascarpone 350g Savoiardi ladyfinger biscuits (this is usually 2 packets) 2 cups strong freshly brewed coffee – cooled ¼ cup Kahlua  Cocoa powder to sift over the top 1 bar Tony’s Chocolonely Milk Chocolate toffee pretzel – roughly chopped INSTRUCTIONS: Whisk the egg yolks, sugar and vanilla together until thickened and lighter in color. Whip the cream until soft peaks have formed – take care not to over whip. Whisk the mascarpone to soften and help it blend with the cream. Fold the cream and mascarpone together and then gently fold in the thickened egg yolks. Mix the coffee and Kahlua together. Dunk the biscuit fingers into the coffee for 1-2 seconds (no longer!) before laying at the bottom of a 20cm x 30cm (approximately) dish. Cover the biscuit layer with half of the tiramisu cream. Sprinkle with half of the chopped chocolate. Top with another layer of coffee soaked biscuits and then a final cream layer. Sift cocoa powder over the top. Store covered in the fridge and allow to sit for at least 4 hours and ideally around 24 hours. Scatter the remaining chocolate over the top just before serving. Cook’s tips Do not over whip the cream. Use the beater on a medium low speed and be patient. This will make the end result more stable. Make sure the mascarpone is at room temperature before you start to use it. Otherwise it can be tricky to incorporate well. Do not dunk the ladyfinger biscuits for too long. They will literally disintegrate in your hands. You can make this without the alcohol if you prefer. It will still be very delicious. Share a picture of your Tony's Chocolonely creations by tagging us on Instagram @cookandnelson.

Read more